
| - JEUS 시작하기 | ||||||||||||||||
|
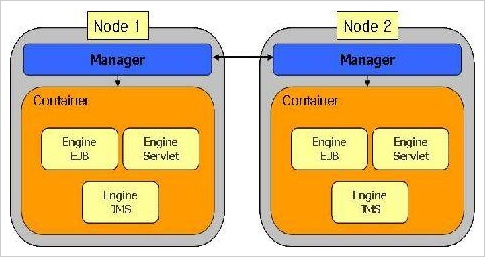
1. 소프트웨어 소개JEUS (Java Enterprise User Solution)는 인터넷으로 각광 받고 있는 Java를 기반으로 한 웹 솔루션으로, 웹 환경에서 어플리케이션을 운용하는 데 필요한 각종 서비스들을 제공해 주는 웹 어플리케이션 서버이다. JEUS는 어플리케이션을 개발하고 실행할 수 있는 플랫폼 역할을 하면서, 트랜잭션 관리, 세션 유지, 부하 분산 등 다양한 기능을 제공할 뿐만 아니라, 계층화된 구조로 유 2. JEUS 디렉토리 구조2.1 전체 디렉토리 구조JEUS를 최초 설치하면 설치 시 지정된 디렉토리(JEUS_HOME)에 다음과 같은 디렉토리가 생긴다. 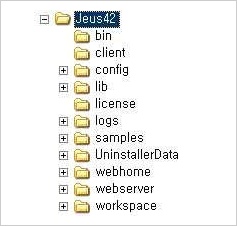 각각의 디렉토리에 대한 설명은 다음에 계속한다. 2.2 bin 디렉토리JEUS의 실행, 모니터링 등 JEUS의 운영에 관련된 스크립트 파일이 존재한다. Windows의 경우에는 batch파일로 있으며, UNIX의 경우에는 shell script파일로 되어 있다. 여기 있는 파일들 중 jeus.properties.bat(UNIX의 경우: jeus.properties)가 있는데 이 파일에는 JEUS실행에 필요한 각종 환경변수들이 설정되어 있다. 이를 제외한 나머지 실행파일들은 실행전에 항상 이 파일을 호출하여 환경변수를 적용하게 되어 있으므로 환경 변수의 수정이 필요한 경우에는 이 파일의 내용을 수정하면 된다. 2.3 client 디렉토리EJB 등을 사용할 경우 client에서 사용하게 될 client모듈 등이 들어가게 되는 디렉토리이다. 일반적인 경우 잘 사용하지 않는다. 2.4 config 디렉토리운영시 사용하게 되는 모든 설정 파일들이 들어있는 디렉토리이다. 하위 디렉토리로 dtds디렉토리는 JEUS설정 파일의 모든 xml에 대한 구조(dtd)를 가지고 있는 디렉토리이고, hostname으로 되어 있는 디렉토리에 현재 운영과 관련된 모든 설정을 가지고 있다. 2.5 lib 디렉토리이 디렉토리는 운영과 관련된 library들이 들어 있다. 아래에는 다음과 같이 3개의 디렉토리가 있다. - application: 개발시 필요한 library들을 넣어두는 디렉토리이다. Jar/zip형태의 파일을 넣어도 되고, package형태로 풀어놓아도 된다. - datasource: 이 디렉토리는 JDBC나 혹은 각종 connector를 위한 library를 넣어두는 디렉토리이다. Jar/zip형태의 파일만 인식한다. - system: 이 디렉토리는 JEUS의 엔진과 관련된 library들이 들어 있다. 위의 디렉토리들 중 개발 혹은 운영 시 필요한 라이브러리들은 application/datasource에 넣어두면 된다. System의 경우는 JEUS에서 사용하는 곳이므로 되도록이면 다른 파일들을 넣지 않는 것이 좋다. 2.6 license 디렉토리라이센스가 들어가는 디렉토리이다. 최초 설치시(JEUS 4.2부터) 3개월간 사용할 수 있는 데모라이센스가 들어가 있다. 라이센스 파일은 license이다. 2.7 logs 디렉토리JEUS 운영 시 남게 되는 각종 로그 파일이 쌓이게 되는 디렉토리이다. JEUS운영환경의 설정에 따라 내부에는 디렉토리나 파일들이 naming rule에 따라 만들어지게 된다. 2.8 samples 디렉토리각종 예제 프로그램들이 목록에 따라 들어가 있는 디렉토리이다. 2.9 webhome 디렉토리최초 설치시 각종 샘플과 같은 각종 application들이 들어가 있는 디렉토리이다. 하위 디렉토리는 다음과 같은 것이 이다. - admin_home: browser를 이용해 JEUS를 제어하고자 할 때 필요한 프로그램들이 들어 있다. 이는 JEUS에서 사용하는 디렉토리이므로 건드리지 않는 것이 좋다. - ejb_home: EJB에 필요한 jar파일이나 class가 들어가는 디렉토리이다. - servlet_home: WEB application이 들어가는 디렉토리이다. - ear_home: EAR application들이 들어가는 디렉토리이다. 이러한 디렉토리들은 유저의 필요에 따라(admin_home제외) 변경을 할 수 있다. 변경을 하고자 한다면 $JEUS_HOME/bin/jeus.properties.bat파일을 열어 관련된 환경변수를 수정하면 된다. 2.10 webserver 디렉토리JEUS에 기본적으로 포함되어 있는 Web Server(WebtoB light)가 들어 있는 디렉토리이다. 2.11 workspace 디렉토리JEUS가 운영 시 내부적으로 사용하는 임시 디렉토리이다. 3. JEUS 실행 구조3.1 process 구조JEUS는 크게 두 가지 형태의 process로 운영된다고 볼 수 있다. 하나는 manager process이고 나머지 하나는 container process이다. 첫째로 manager process는 container process를 관리하는 역할과 clustering환경 구성 시 JEUS 상호간에 필요한 정보들을 주고 받는 process로 개발 후 만들어진 각종 application과는 직접적인 두 번째로 container프로세스는 개발자에 의해 개발된 application을 실행시켜 주는 process이다. 이러한 구조를 그림으로 나타내면 다음과 같다.
위 그림에서처럼 manager process는 자신에게 포함된 container들을 관리하는 역할과 물리적으로 떨어져 있는 서버의 또 다른 manager process와 통신을 하면서 clustering환경을 유지하는 역할을 하게 된다. Container process는 하나의 서버에 여러 개가 존재할 수 있다. 또한 container process는 여러 개의 engine을 포함하게 된다. 이러한 engine이 개발된 application 중 자신에게 해당하는 application을 실행시켜주게 된다. 예를 든다면 EJB engine은 EJB프로그램을 Servlet engine은 WEB application을 실행하게 되는 것이다. 이러한 container process는 하나의 독립적인 process로 동작하게 된다. 3.2 설정 파일앞에서 JEUS의 모든 설정 파일은 $JEUS_HOME/config 디렉토리에 존재한다고 했었다. Config 디렉토리의 구조를 살펴보면 다음과 같다. 아래 그림은 최초 설치 시 만들어져 있는 디렉토리이다.
앞에서도 간단히 설명을 했듯이 dtds 디렉토리는 xml과 관련된 dtd파일이 들어 있는 곳이고, security 디렉토리는 JEUS운영 시 사용하게 되는 policy파일이 들어 있는 디렉토리이다. 나머지 hostname(그림에서는 ybsong_note)으로 되어 있는 디렉토리인데, 현재 JEUS가 설치된 서버의 운영과 관련된 모든 설정들은 이 디렉토리에 들어 있다. 가장 먼저 살펴볼 파일은 hostname 디렉토리에 들어 있는 JEUSMain.xml파일이다. 참고로 운영을 위해 각종 설정 파일을 생성할 때 먼저 JEUSMain.xml파일을 만들게 되고, 이 파일의 구성에 따라 부수적으로 필요한 설정 파일을 만들어 설정을 하게 된다. JEUS에서 가장 중요한 설정 파일로 가장 기본이 되는 설정으로 manager프로세스에 대한 설정이라고 보면 된다. 여기에는 어떠한 container프로세스가 있는지 또 container에는 어떠한 engine이 들어 있는지에 대한 설정이 포함되어 있다. JEUS구동 시에도 가장 먼저 이 파일을 읽어 들인 후 설정에 따라 필요한 container process를 실행시킨다고 생각하면 쉽게 이해될 것이다. 아래는 최초 설정 시 들어 있는 JEUSMain.xml 파일이다.
아래에 중요한 몇 개의 tag에 대해 설명하였다. - node: 하나의 서버를 의미한다. 물리적인 하나의 서버를 의미한다고 봐도 무방하다. 내부에 engine-container tag를 포함하고 있다. - engine-container: 앞에서 설명한 container process를 의미한다. 여러 개를 가질 수 있으며 이는 여러 개의 container프로세스가 운영될 수 있음을 의미한다. - engine-command: 이는 앞에서 언급된 engine을 의미한다. Type에 따른 하는 운영되는 application의 형태가 달라지게 된다. 위의 tag중 engine-container와 engine-command를 적절히 조합하여 필요한 만큼의 container process와 engine을 생성하면 된다. JEUSMain.xml의 설정이 끝났다면 이젠 여기서 설정된 engine들에 대한 설정이 필요하게 된다. 참고로 Container process에 대한 설정은 필요하지 않다. 이유는 Container process가 application을 운영하는 기본 단위가 아니고 engine이 기본 단위이므로 이들에 대한 설정만을 필요로 한다. 다시 말하면, container process는 말 그대로 하나의 process의 단위이며 engine을 묶어주는 그룹의 개념만을 지니고 있으므로 JEUSMain.xml의 내용만으로 더 이상의 설정은 필요 없는 것이다. JEUSMain.xml에 대한 자세한 설정은 JEUS Server 매뉴얼을 참조하면 된다. 3.4 engine의 설정 파일Engine의 설정 파일은 engine의 이름으로 된 디렉토리 아래에 존재하게 된다. Engine의 이름을 붙이는 방법은 JEUS의 내부의 naming rule로 다음과 같이 JEUSMain.xml파일의 내용을 가지고 만들어지게 된다. [hostname]_[engine tag의 type]_[engine tag의 name] 앞에서 보여진 JEUSMain.xml파일을 참고하면 다음과 같이 두 개의 engine이름이 존재하게 되는 것이다. - ybsong_note_ejb_engine1 - ybsong_note_servlet_engine1 이렇게 engine의 이름을 만들었다면 이러한 엔진을 위한 설정파일이 들어가게 되는 디렉토리를 만들어야 한다. 그 디렉토리는 바로 JEUSMain.xml이 있는 디렉토리에 engine이름으로 디렉토리를 만들면 된다(앞에서 보인 config디렉토리의 구조에 관한 그림 참조). 각 engine에 대한 설정 파일들은 모두 자신의 이름으로 된 디렉토리 안에 존재하게 되는 것이다. 또한 각 engine마다 필요한 설정 파일은 engine의 type에 따라 달라지게 된다. Type은 세 가지가 있다. 아래에 type에 따른 설정 파일의 이름을 기술해 놓았다. - servlet type: WEBMain.xml - ejb type: EJBMain.xml - jms type: JMSMain.xml 이후에는 이들 중 가장 많이 사용하는 servlet과 ejb type의 설정 파일에 대해 살펴본다. 3.5 servlet engine의 설정 파일앞에서 봤듯이 servlet type engine의 주 설정 파일은 WEBMain.xml이다. 최초 설치 시 아래와 같은 설정 파일이 [hostname]_servlet_engine1 디렉토리에 들어 있다.
위의 파일 내용 중 몇 개의 tag만 아래에서 설명한다. - context-group: 이 tag는 context의 묶음을 의미한다. J2EE spec에서는 context에 대해서만 기술되어 있다. JEUS에서 context group의 개념을 사용하는 것은 세션 정보의 공유 등을 위해서 사용한다. 말 그대로 group의 개념이므로 내부에 context tag를 포함하고 있음을 알 수 있다. 참고로 context는 WEB application의 단위로 생각하면 쉽게 이해할 수 있다. group-docbase는 이 group이 물리적으로 존재하는 디스크 내 위치(디렉토리)를 의미한다. - context: WEB application의 단위이다. Context의 설정에 따라 이에 따른 deployment descriptor(DD)파일이 하나씩 더 존재하게 된다. 그 파일의 위치는 WEBMain.xml과 같은 위치이며 이름은 jeus-web-dd_[context_name].xml파일이다. - webserver-connection: servlet type의 engine은 WEB application을 처리하는 engine이므로 web server와의 아래에는 context마다 하나씩 존재하게 되는 DD파일을 표시하였다.
DD파일은 각각의 context에 대한 설정을 나타낸다. Context-name은 WEBMain.xml에 설정된 context-name을 의미하고, docbase는 디스크 상에서의 물리적인 위치다. Auto-reload는 운영 시 프로그램이 수정될 경우 이를 바로 반영할지에 대한 여부를 나타낸다. 그 외 자세한 내용들은 JEUS Web Container매뉴얼을 참조하면 된다. 3.6 EJB engine의 설정 파일EJB type engine의 주 설정 파일은 EJBMain.xml 파일이다. 최초 설치 시 포함된 EJBMain.xml파일은 다음과 같다.
위의 tag 중 module-list는 이 engine이 시작될 때 가지고 올라가야 할 EJB 모듈을 나열하는 tag이다. EJB engine의 경우 위와 같이 간단하다. 이는 EJB의 경우 engine의 설정보다는 EJB를 구성하는데 필요한 ejb-jar.xml파일과 DD.xml에 많은 내용들이 기술되어 있기 때문이다. 이들에 대한 내용은 개발과 관련된 부분이므로 JEUS EJB 매뉴얼 혹은 개발자 교재를 참조하면 된다. 4. JEUS 구동 및 종료4.1 JEUS의 console tool을 이용한 구동 및 종료JEUS의 구동은 크게 두 가지 작업으로 나누어진다. 먼저 JEUS manager process(jeus명령어)를 구동한 후 jeusadmin tool을 이용해 manager에 접속한 boot명령을 이용해 부팅을 하게 된다. Manager를 구동하면 다음과 같이 보여진다.
위와 같이 Ready 메시지가 나오면 manager가 구동된 것이다. 다른 command창을 열러 jeusadmin [hostname] 명령을 주어 manager에 아래와 같이 로그인 한 후 boot명령을 보내면 된다. ID/password를 물어보게 되는데, 최초 설치 시 ID는 administrator이며 password는 설치 시 입력한 값을 넣으면 된다.
위의 과정은 manager에 로그인 한 후 boot명령을 통해 JEUSMain.xml의 설정에 따라 container를 올리는 작업과 down명령을 통해 내리는 작업을 순차적으로 나열한 것이다. jeusexit명령어는 앞에서 띄워놓은 manager를 종료시키는 작업을 수행한다. exit명령어는 jeusadmin tool을 빠져나가는 명령어이다. 이와 같은 과정을 거쳐 JEUS를 기동하고 내리는 작업을 완료하였다. 하지만 때에 따라서는 이러한 작업이 복잡하게 느껴질 수 있다. 편의를 위해 JEUS에서는 one-step으로 JEUS를 구동하고 종료할 수 있는 방법을 제공한다. 아래와 같은 방법을 통하면 그러한 작업을 쉽게 할 수 있다.
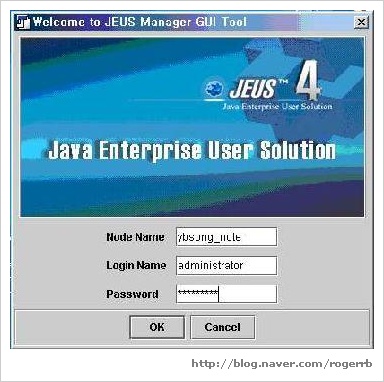
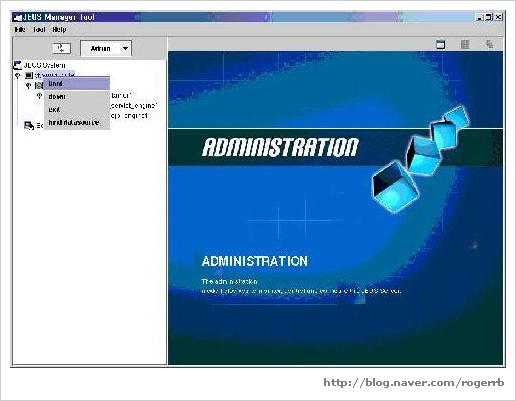
4.2 JEUS의 GUI tool인 JManager를 이용한 구동 및 종료JManager는 GUI를 이용해 JEUS를 제어할 수 있도록 하는 tool이다. 실행하는 방법은 command창에서 jmanager라고 입력을 하면 된다. 이 tool을 이용해 부팅을 하기 위해서는 console을 이용할 때와 마찬가지로 jeus명령어를 이용해 manager process가 구동되어 있어야 한다. JManager를 구동하면 가장 먼저 다음과 같이 ID/password를 물어보는 창이 보여진다.
로그인을 하면 다음과 같이 화면이 보여지게 된다.
위와 같이 화면이 나타나면 왼쪽 tree에서 hostname부분을 마우스 오른쪽 버튼을 눌러 나타나는 팝업 메뉴에서 boot를 선택하면 된다. 종료를 할 때에는 down을 선택하면 된다. 그 외 JManager에 대한 자세한 내용은 JEUS GUI 매뉴얼을 참조하면 된다. 4.3 JEUS의 WEB tool을 이용한 구동 및 종료WEB tool은 browser를 이용한 방법을 의미한다. WEB tool을 사용하기 위해서는 먼저 JEUSMain.xml에 다음과 같이 설정이 되어 있어야 사용할 수 있다. JEUS 4.2의 경우 설치 시 기본적으로 설정되어 있으므로 따로 설정할 필요는 없다.
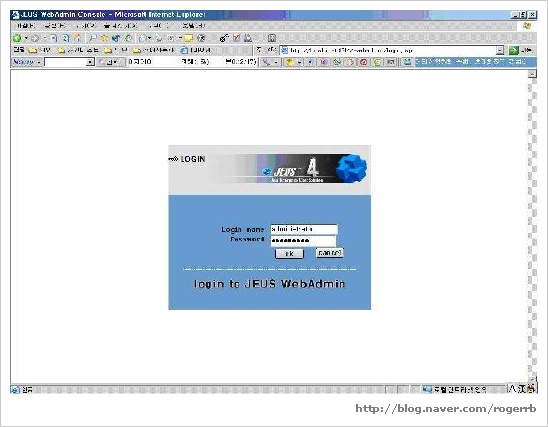
Console tool 혹은 JManager를 이용할 경우에는 jeus명령어를 통해 manager process만 기동되어 있으면 사용할 수 있었으나, WEB tool의 경우 boot명령까지 완료되어 있는 상태에서 사용할 수 있다. 이는 WEB tool이 내부적으로 servlet engine을 사용하기 때문이다. One-step 부팅을 이용하면 쉽게 사용할 수 있다. 먼저 부팅이 되어 있는 상태에서 다음과 같이 접속을 하면 ID/password를 물어보는데, 이후부터는 JManager와 비슷한 방법으로 사용을 하면 된다. 접속 URL: http://ip:9744/webadmin IP는 JEUS가 설치된 서버의 ip를 말하며 9744는 default port이다. 이 값은 환경변수에 따라 달라지는데, 기본적으로 JEUS_BASEPORT + 8번의 값을 사용한다. JEUS_BASEPORT는 $JEUS_HOME/bin/jeus.properties.bat파일에 설정되어 있다. 최초 브라우저를 이용해 접속을 하면 다음과 같은 화면이 보여지게 된다.
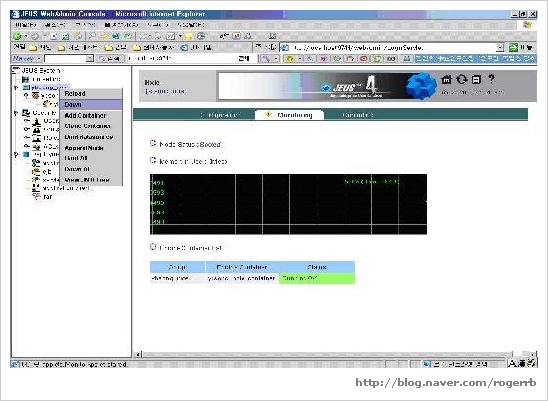
ID/password를 입력한 후 로그인을 하면 다음과 같은 화면이 보여지게 된다.
이후부터는 직접 부팅과 다운 작업 및 설정의 변경, 모니터링과 같은 작업을 수행할 수 있다. 5. container의 추가5.1 설정 파일을 직접 편집하는 방법이는 3장에서 설명한 방법으로 직접 설정 파일을 편집하면 된다. 가장 먼저 편집해야 할 파일은 JEUSMain.xml 파일이다. 파일을 열어 engine-container tag를 하나 더 만들면 된다. 쉽게 작업을 하려면 기존에 있는 engine-container tag를 copy & paste한 후 필요한 부분들만 수정하면 된다. 수정이 필요한 부분은 engine-container/name tag의 name과 engine-command/name부분이다. 이를 수정하는 이유는 container의 이름과 engine의 이름이 중복되어 사용할 수 없기 때문이다. JEUSMain.xml파일의 수정이 완료되었다면 그에 따라 engine의 설정 파일을 만들어 주어야 한다. 역시 3장에서 설명한 것처럼 engine의 이름에 따라 디렉토리를 만든 후 engine의 type에 따른 설정 파일(WEBMain.xml, EJBMain.xml 혹은 JMSMain.xml)을 만들어 준다. 역시 작업을 쉽게 하려면 기존에 있는 디렉토리 전체를 복사한 후 쉽게 각 설정 파일 중 필요한 부분만 수정을 하면 된다(ex: http-listener부분의 port와 같은 부분). 5.2 WEB tool을 이용하는 방법여기서는 WEB tool을 이용하는 방법에 대해서 설명한다. JManager를 이용하는 방법에 대해서는 JEUS GUI tool 매뉴얼을 참조하면 된다.
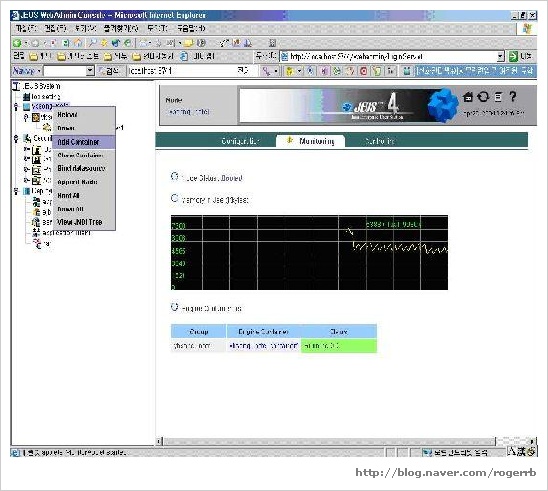
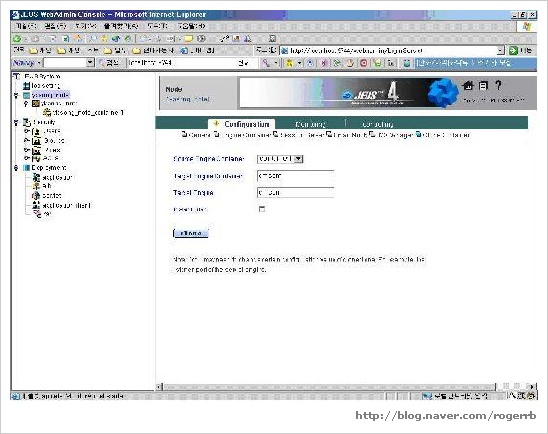
위의 그림에서처럼 tree에서 hostname으로 된 아이콘을 마우스 오른쪽 버튼으로 클릭하면 팝업 메뉴가 나타나는데 여기서 Add container를 선택하여 container를 추가할 수 있다. 하지만 이렇게 Add container를 할 경우 앞에서 설정 파일을 직접 편집할 때처럼 직접 많은 설정들을 해주어야 하므로 조금은 불편할 수 있다. 직접 편집을 할 때 복사해서 사용한 것처럼 WEB tool에서는 container를 복제해주는 작업을 손쉽게 할 수 있는 기능이 있다. 이는 Clone container메뉴를 선택해서 사용하면 된다. 위의 그림에서 clone container를 선택하면 아래와 같은 화면이 보여지게 된다.
위의 그림처럼 오른쪽 프레임에 몇 가지 설정을 할 수 있는 화면이 보여진다. Source Engine Container는 복제할 container를 의미하며, Target Engine Container는 만들어질 container의 이름을 의미한다. 그리고 Target Engine은 engine의 이름으로 사용할 이름을 말한다(여기서는 dmscm이라고 했으므로, ybsong_note_servlet_dmscm과 ybsong_note_ejb_dmscm 이라는 engine이 만들어질 것이다). 또한 Instant Start는 만들어진 container를 바로 부팅할 것인지의 여부를 설정하는 것이다. 바로 부팅을 할 경우 포트의 충돌 등으로 인해 정상 동작하지 않을 수 있으므로 여기서는 선택을 하지 않도록 한다. Clone버튼을 누르면 container를 복사하는 작업이 수행된다.
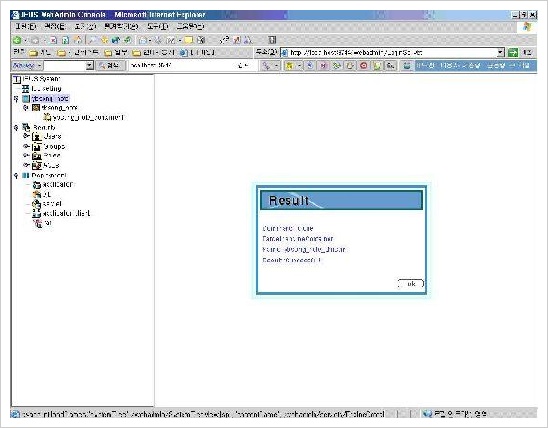
위와 같이 성공했음을 보여주는 메시지가 나오고 난 후 왼쪽 tree중 hostname부분을 다시 클릭해보면, 아래 그림과 같이 두 개의 container가 있음을 알 수 있다. 이 중 컬러로 보여지는 것은 현재 부팅되어 운영되고 있음을 나타내고, 흑백으로 보여지는 것은 설정은 되어 있으나 운영은 되고 있지 않음을 나타낸다. 이제 몇 가지 수정 작업을 해야 하므로 수정이 필요한 container를 tree에서 선택한 후 보여지는 오른쪽 프레임의 상단 메뉴 중 Configuration을 선택해 필요한 작업을 하도록 한다. 마우스로 필요한 곳들을 클릭하면서 필요한 설정을 변경하는 작업을 하면 된다.
6. 기타 console tool6.1 jeusadmin 사용하기jeusadmin tool은 manager에 접속한 후 manager를 제어하기 위한 tool이다. Container의 부팅/다운, engine의 부팅/다운 작업 등을 수행할 수 있다. - jeusadmin <HostName>
1) 현재 떠있는 엔진 목록보기 각 서버별로 설정에 따라 Engine Container로 1개 혹은 그 이상 구동 중이며, 각 JVM 한 개의 Engine Container에는 servlet engine 혹은 EJB Engnine이 구동 되고있다.
위와 같이 수행을 하게 되면 현재 구동중인 엔진의 목록을 볼 수 있다. 또한 위의 엔진들을 booting / down 할 수도 있다. (help 명령어 참조) 방법 : starteng / downeng <engineName> 예) starteng ybsong_note_servlet_engine1 downeng ybsong_note_servlet_engine1 2) 현재 떠 있는 Engine Container PID 목록보기 Engine Container는 각각의 엔진을 담는 그릇과 같은 것으로 JVM 1개를 의미한다.
현재 운영중인 JVM에 대한 PID할당 정보를 얻을 수 있으며, 또한 위의 Engine Container를 booting / down 할 수도 있다. (help 명령어 참조) 방법 : startcon / downcon <containerName> 예) startcon ybsong_note_container1 downcon ybsong_note_container1 6.2 webadmin 사용하기webadmin tool은 servlet type의 엔진을 관리하기 위한 console tool이다. 현재 servlet engine의 모니터링 및 동적인 설정의 변경과 같은 작업을 수행할 수 있다. - webadmin <engineName>
1) servlet engine의 상태정보 보기(st명령)
st 명령을 수행하게 되면 다음의 목록을 보여준다. 1) 해당 jvm의 메모리 사용현황 : st ?m 2) DBConnectionPool의 실시간 사용현황 : st ?d 3) Web Server와의 4) 설정한 Context로 들어온 요청 count와 평균처리시간 : st ?r 5) 유지하고 있는 Session 객체의 개수 : st ?s 위에서 주의 깊게 보아야 할 것은 다음과 같다. 1) jvm의 메모리 사용현황을 통하여 애플리케이션상의 Memory leak 현상이 없는지 파악하여야 한다. 즉 jvm의 메모리 사용이 계속 증가하면 이를 의심해 보아야 한다. 2) Session Information을 통해서는 현재 login을 통하여 들어와 있는 유저수를 알 수 있다. * 2) 호출된 애플리케이션 정보보기
각 ContextGroup안에 있는 Context별 호출된 Application의 호출 빈도수를 알아 볼 수 있다. 이를 통해서 많이 호출되고 있는 Application을 추출할 수가 있다. * 3) application 수행 thread의 상태보기
위의 정보를 통하여 현재 실시간으로 들어오고 있는 uri 정보를 볼 수가 있다. 특히 rt(=run time)라는 수행시간정보를 통하여 해당 호출된 서비스가 waiting에 빠졌는지, 처리가 얼마나 걸리고 있는지를 실시간으로 모니터링 할 수 있다. 만일 rt 시간이 비정상적으로 길어지거나, 모든 *
* ti ?a 를 이용하여 요청을 처리한 건수 및 처리시간 평균을 보여준다 |
No comments:
Post a Comment